


使用Python+OpenCV進行圖像處理(三)
我們的英雄在哪?
接下來讓我們使用上述級聯分類器實現漫威英雄面部檢測--驚奇隊長面部檢測。
")
001 (15)
我們只須使用圖像中的一部分即頭部部分。首先,獲取驚奇隊長臉部周圍感興趣區域;然后把圖像轉換成灰度圖。之所以只使用一個通道,是因為我們只對特征的像素值強度變化感興趣。
cap_mavl = cv2.imread('images/captin_marvel.jpg')
# Find the region of interest
roi = cap_mavl[50:350, 200:550]
roi = cv2.cvtColor(roi, cv2.COLOR_BGR2GRAY)
plt.imshow(roi, cmap = 'gray')

通過下方代碼使用Haar級聯分類器。
# Load Cascade filter
face_cascade = cv2.CascadeClassifier('haarcascades/haarcascade_frontalface_default.xml')
接下來,我們將創建一個函數來檢測人臉并在目標區域周圍繪制一個矩形。為了檢測人臉,我們可以使用上面加載的分類器face_cascade的. detectmulitscale()方法。它返回指定區域的四個點所以我們在那個位置畫一個矩形。scaleFactor是一個參數,表示在每個圖像尺度上圖像大小減少了多少,minNeighbors表示每個候選矩形應該訓練多少個鄰居。現在我們把這個函數應用到圖像上,看看結果。
# Create the face detecting function
def detect_face(img):
img_2 = img.copy()
face_rects = face_cascade.detectMultiScale(img_copy,
scaleFactor = 1.1,
minNeighbors = 3)
for (x, y, w, h) in face_rects:
cv2.rectangle(img_2, (x, y), (x+w, y+h), (255, 255, 255), 3)
return img_2
# Detect the face
roi_detected = detect_face(roi)
plt.imshow(roi_detected, cmap = 'gray')
plt.axis('off')
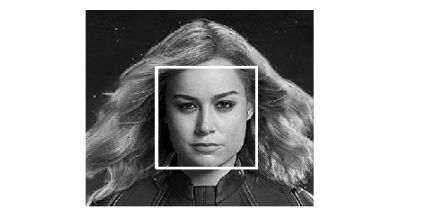
正如看到的那樣,haar級聯分類器取得了不錯的人臉檢測效果。接下來,讓我們嘗試檢測含有多張人臉的圖片。
# Load the image file and convert the color mode
avengers = cv2.imread('images/avengers.jpg')
avengers = cv2.cvtColor(avengers, cv2.COLOR_BGR2GRAY)
# Detect the face and plot the result
detected_avengers = detect_face(avengers)
display(detected_avengers, cmap = 'gray')
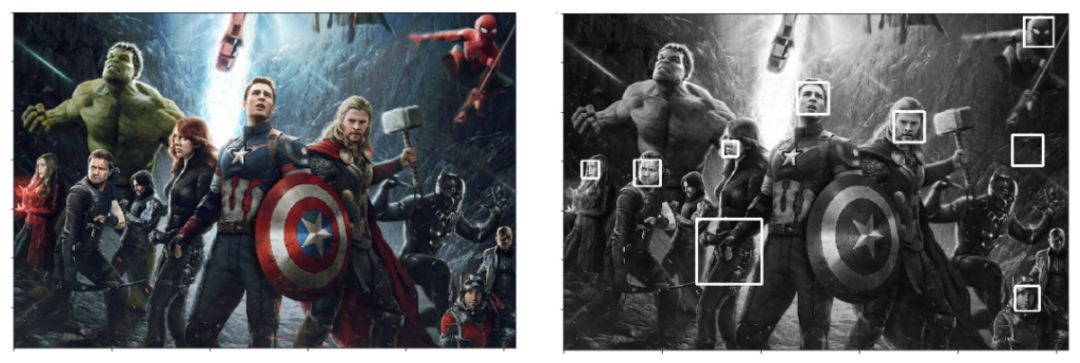
很明顯檢測結果不完全準確。出現了錯誤捕捉“非人臉”目標以及丟失了部分“真實人臉”。有趣的是,它成功地探測到了蜘蛛俠,卻把美國隊長和黑寡婦的手誤當成了眼睛。通常在人臉圖像凸顯出更加清晰的五官時,可以得到更好的人臉檢測結果。
嘗試檢測自己的臉
接下來介紹使用網絡攝像頭檢測人臉的實現方法。類似上方的實現方式。代碼如下方所示。可以通過ESC按鍵終止退出檢測。
import cv2
import numpy as np
# Step 1. Define detect function
face_cascade = cv2.CascadeClassifier('haarcascades/haarcascade_frontalface_default.xml')
def detect_face(img):
img_copy = img.copy()
face_rects = face_cascade.detectMultiScale(img_copy)
for (x, y, w, h) in face_rects:
cv2.rectangle(img_copy, (x, y), (x+w, y+h), (255, 255, 255), 3)
return img_copy
# Step 2. Call the cam
cap = cv2.VideoCapture(0)
while True:
ret, frame = cap.read(0)
frame = detect_face(frame)
cv2.imshow('Video Face Detection', frame)
c = cv2.waitKey(1)
if c == 27:
break
cap.release()
cv2.destroyAllWindows()
總結
本篇介紹了傳統的邊緣檢測、角點檢測以及人臉檢測方法。下篇將介紹輪廓檢測技術等。敬請期待。

 分享
分享
請輸入評論內容...
請輸入評論/評論長度6~500個字


最新活動更多

先進LED照明系統,引領未來趨勢新標桿")


- 1 AI狂歡遇上油價破百,全球股市還能漲多久? | 產聯看全球
- 2 OpenAI深夜王炸!ChatGPT Images 2.0實測:中文穩、細節炸,設計師慌了
- 3 6000億美元估值錨定:字節跳動的“去單一化”突圍與估值重構
- 4 Tesla AI5芯片最新進展總結
- 5 連夜測了一波DeepSeek-V4,我發現它可能只剩“審美”這個短板了
- 6 熱點丨AI“瑜亮之爭”:既生OpenClaw,何生Hermes?
- 7 AI界的殺豬盤:9秒刪庫跑路,全員被封號,還繼續扣錢!
- 8 2026,人形機器人只贏了面子
- 9 DeepSeek降價90%:價格屠夫不是身份,是戰略
- 10 AI Infra產業鏈卡在哪里了?


